Introduction
1st of October 2022 Microsoft Exchange Online stopped supporting basic authentication, and will require all connections to use more secure protocols such as the one called “OAuth2”
For more details on this please refer to : https://docs.microsoft.com/en-us/exchange/clients-and-mobile-in-exchange-online/deprecation-of-basic-authentication-exchange-online
All our clients who are using “MS Exchange Online” to send emails from TM Master and or for replication (TM Exchange) needs to update TM Master and re-configure the mail settings in TM Master and TM Exchange, to avoid replication to stop.
Please note that example data provided in this document may not always apply to your environment.
We have provided details, which are excerpts of the Microsoft guide (ref link below), on how to configure Microsoft Azure side ,to enable TM Master to send and receive emails using the OAuth2 protocol. If something is found lacking in this description, please refer to the Microsoft own guides and descriptions. https://docs.microsoft.com/en-us/exchange/client-developer/legacy-protocols/how-to-authenticate-an-imap-pop-smtp-application-by-using-oauth
Tero Marine will not offer any support configuring the e-mail system.
How to configure the TM Master V2 mail settings to use the OAuth2 protocol.
The TM Master v2 mail settings are used to send emails such as
- Request for quotations
- Order e-mails.
- Reminder e-mails
- Various “Send as E-mail” features found in HSEQ modules and the Voyage module.
Pre-requisite:
Make sure the TM Master V2 client version number is:
- For DB version 662: 2.662.8271.xxxxx or higher
- For DB version 664: 2.664.8271.xxxxx or higher
- For DB version 665: 2.665.8271.xxxxx or higher
Click [System] -> [Settings] -> “Mail Settings” tab
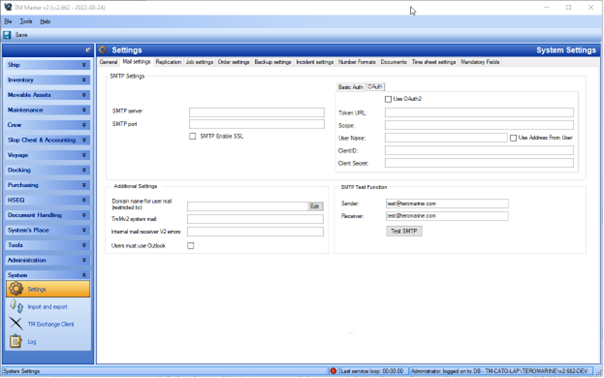
- Enter the new mail server details
-
SMTP Server: Enter the SMTP server address
The address path may look something like this:
example https://graph.microsoft.com/v1.0/users/example@email.com/sendMail
The email in the example above (example@email.com) should be replaced with the e-mail address you have configured for this purpose. Alternatively, the address can be replaced with “{0}“ in which case TM Master will try to use the e-mail address registered to the current user when sending e-mails. If user email is not found it will default to the e-mail address entered as “username” in the OAuth2 settings.
Example: https://graph.microsoft.com/v1.0/users/{0}/sendMail
- SMTP Port: This can be ignored when using OAuth2
- SMTP Enable SSL: Tick this check box, SSL should be enabled
- Click the “OAuth2” tab in the tab control to the left of the server details. The “Basic Auth” tab can be ignored.
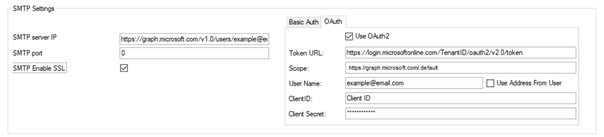
Enter the following required login details:
- Use OAuth2: Tick this check box
-
Token URL: Enter the token URL to your mail server:
It may look like this: https://login.microsoftonline.com/TenantID/oauth2/v2.0/token
(Replace “TenantID” with the Tenant ID from your Azure environment)
For More details on how to get the token can be found here:
- Scope: Enter the full scope: https://graph.microsoft.com/.default
- User Name: Enter the user name (email address) for the account to be used when sending emails from the system. It will also serve as a default address in case user trying to send an email from the system does not have a registered valid address (ref: SMTP Server setting)
-
Use Address from User: Tick this if you want each user sending emails to use their own email address (the one registered on their TM Master user), when sending.
(Will require the use of the variable “{0}“ in the SMTP address. (ref: SMTP Server setting) - Client ID: Enter the “Application (client) ID”. This should be the ID Azure assigned to TM Master when you registered the application with the Microsoft identity platform.
- Client Secret: Enter the client secret for the client ID
Once all details are entered, it is possible to test if TM Master can send e-mails using these settings. By using the SMTP Test function. This can be done in the following manner:
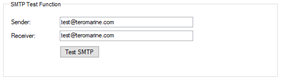
- Sender: Enter an e-mail address that should be allowed to send email from the system.
- Receiver: Enter valid email address
- Click the [Test SMTP] button
How to Configure TM Exchange to use the OAuth2 protocol?
Pre-requisite:
Make sure the TM Master V2 client version number is:
- For DB version 662: 2.662.8271.xxxxx or higher
- For DB version 664: 2.664.8271.xxxxx or higher
- For DB version 665: 2.665.8271.xxxxx or higher
Make sure the TM Master V2 Server Service version number is:
- For DB version 662: 2.662.8271.xxxxx or higher
- For DB version 664: 2.664.8271.xxxxx or higher
- For DB version 665: 2.665.8271.xxxxx or higher
- If the client or the server service has a lower version number than the one specified above, you will need to upgrade them, to at least the ones specified above or higher.
- Click [System] -> [TM Exchange Client] -> “Settings” tab

SMTP Settings:

-
SMTP Server: Enter the SMTP server address.
The address path may look something like this example: https://graph.microsoft.com/v1.0/users/example@email.com/sendMail
The email in the example above (example@email.com) should be replaced with the e-mail address you have configured for replication for the particular installation. - SMTP Port: Not used. his can be ignored for SMTP server when using OAuth2
- Sender Address: Enter the e-mail address for the account to be used.
- Senders Name: Not used. This can be ignored when using OAuth2
- Timeout: Enter the maximum time TM Exchange should wait for a response from the mail server before giving up. (100 Seconds is a reasonable value)
- Use SSL/TLS: Tick this check box. SSL/TLS is required for OAuth2
- Click the “OAuth2” tab in the tab control to the left of the SMTP server fields and fill in the details . (The “Basic Auth” tab can be ignored)
- Use OAuth2: Tick this check box
-
Token URL: Enter the token URL to your mail server:
It may look like this: https://login.microsoftonline.com/TenantID/oauth2/v2.0/token
(Replace “TenantID” with the Tenant ID from your Azure environment)
For More details on how to get the token can be found here:
- Scope: Enter the scope: https://graph.microsoft.com/.default
- User Name: Enter the user name (email address) for the account to be used when sending emails from the system.
- Client ID: Enter the “Application (client) ID”. This should be the ID, Azure assigned to TM Master when registering the application with the Microsoft identity platform.
- Client Secret: Enter the client secret for the client ID
POP3 Settings
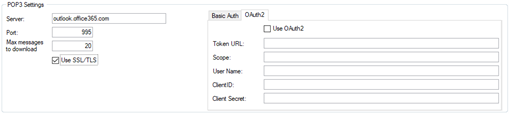
- Server: Enter the POP3 Server address (outlook.office365.com)
- Port: Enter the port to use for outlook.office365.com this should be 995
- Max message to download: Is not related to the authentication, so this value can be left as is. It limits the number of messages downloaded per TM Exchange service cycle.
- Use SSL/TLS: Tick this check box. SSL/TLS is required for OAuth2
- Click the “OAuth2” tab in the tab control to the left of the POP3 server fields and fill in the details . (The “Basic Auth” tab can be ignored)
- Use OAuth2: Tick this check box
- Token URL: Enter the token URL to your mail server: It may look like this: https://login.microsoftonline.com/TenantID/oauth2/v2.0/token. It will in most cases be the same as for the SMTP server.
-
Scope: Enter the POP3 Server scope. For outlook.office365.com this should be:
https://outlook.office365.com/.default - User Name: Enter the e-mail address to retrieve\download e-mail from.
- Client ID: Enter the “Application (client) ID”. This should be the ID, Azure assigned to TM Master when registering the application with the Microsoft identity platform.
- Client Secret: Enter the client secret for the client ID
Register your TM Master with your Azure AD
- Log on to your Azure portal https://portal.azure.com
- Click on “App registrations”
- Click [New Registration]
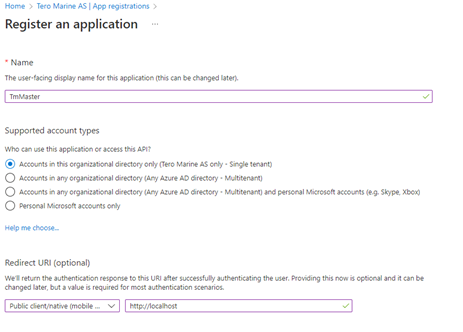
Enter details
- Name: Enter name of application: TMMaster
- Supported account types: Select the appropriate value for your company.
- Redirect URI: Enter : http://localhost
Make sure TM Master has the needed API permissions:
- Click [ + Add a permission]

- Click [Application Permissions]
- Enter “Mail.Send” in the permission search bar
- Tick the “Mail.Send”
- Click the [Add Permissions] button
- Close the “Request API permissions” dialog

- Click the [+ Add permissions] again.
- Click [APIs my organization uses]

- Type “Office” in search bar
- Select “Office 365 Exchange Online”

- Click the [Application Permissions] link
- Enter “Access” in the search bar.
- Tick “IMAP.AccessAsAPP”
- Tick “POP3.AccessAsAPP”
- Click the [Add Permissions] button

Close the “Request API permissions” dialog
Now click “Grant admin consent for”, and select the APIs just added
- Mail.Send
- IMAP.AccessAsApp
- POP.AccessAsApp
The result should look like the screen shot below

Create a “Client Secret” for the application (TMMaster)
- Click “Certificates & Secrets”
- Click “Client secrets”
- Click “New Client Secret”
- Enter a name
- Set an Expiry date
A “Client Secret” will be generated
NOTE! Be sure to copy the “Value” before leaving the page. After leaving the page it will not be possible to retrieve the “Client secret” value. This value is needed to configure TM Master.

The configuration described above applies to all TM Master installations, configured with the “Client ID” and “Client secret”.
How to find the details required to grant TM Master access to download?
Find the “Tennant ID” or <ORANIZATION_ID>
- Log onto “portal.azure.com”
- Enter “tenant” in the search bar

- A page with the “Tenant ID” will show

- Copy it to a notepad or similar, to use later.
NOTE! This information should be treated as “confidential information” and not freely shared.
Find the <APPLICATION_ID> and the <OBJECT_ID>
- Log onto “portal.azure.com”
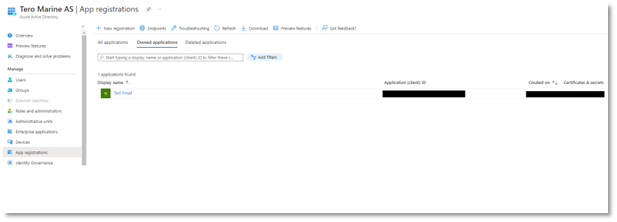
- Go to “Enterprise applications” à “Overview”
- Search for the newly registered APP. IE: “TMMaster”
- Click it to view details

- Copy the <APPLICATION_ID> and <OBJECT_ID> to a notepad or similar, to use later.
TIP! The OBJECT_ID is the object ID from the overview of the Enterprise Application node (Azure Portal) for the application registration (as shown above). It is not the Object ID from the Overview of the App Registration node (as shown below). Using the incorrect Object ID will cause an authentication failure
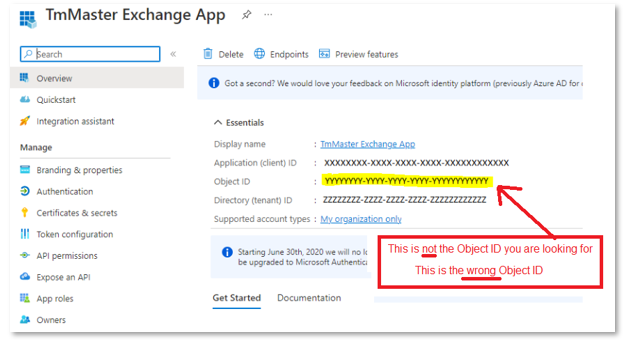
NOTE! This APPLICATION_ID and OBJECT_ID information should be treated as “confidential information” and not freely shared.
How to grant TM Master (TM Exchange) access to download emails from an account
TM Exchange needs to be able to download replication emails from the various involved email accounts. To enable TM Master to do this TM Master will need “Read” access to the mailboxes
NOTE! This is one way to do this in the Microsoft environment, your IT department may have different ways and procedures to implement this. Please make sure you are implementing this following your IT Guidelines and procedures, before proceeding.
- You will need the following details from Azure (ref chapter above)
- Application (client) ID - <APPLICATION_ID>
- Object ID <OBJECT_ID>
- Directory (tenant) ID <ORGANIZATION_ID>
- Open Exchange Online Management console
- Open admin.microsoft.com
- Open Azure Cloud Shell, by clicking the button to the right in the top menu bar

- Type AND Run “Connect-EXOPSSession” to connect to Exchange
- Enter the commands listed in step 3 to 5 below.
3. Register the Azure application in Exchange (only needs to be run once)
- New-ServicePrincipal -AppId <APPLICATION_ID> -ServiceId <OBJECT_ID> [-Organization <ORGANIZATION_ID>]

4. Get the Exchange ID for the Azure application using this command:
- Get-ServicePrincipal -Organization <ORGANIZATION_ID> | fl
(Service Principal ID is called “ExchangeObjectId” in the service principal list)
5. Use the Service Principal ID to grant access to the mailboxes used for replication
Note! This command must be run once per email account:
- Add-MailboxPermission -Identity "example@email.com" -User <SERVICE_PRINCIPAL_ID> -AccessRights FullAccess
Example:
- <APPLICATION_ID> = AAAAAA
- <OBJECT_ID> = OOOOO
- <ORGANIZATION_ID> = TTTTTT
-
Register the Azure application in Exchange
- New-ServicePrincipal -AppId AAAAAAA -ServiceId OOOOO [-Organization TTTTTTT]
- New-ServicePrincipal -AppId AAAAAAA -ServiceId OOOOO [-Organization TTTTTTT]
-
Get the Exchange ID for the Azure application
- Get-ServicePrincipal -Organization TTTTTTT | fl
- <SERVICE PRINCIPAL_ID> = SSSSS
- Mailbox = example@email.com
- Get-ServicePrincipal -Organization TTTTTTT | fl
-
Grant access to mailbox
- Add-MailboxPermission -Identity "example@email.com" -User SSSSS -AccessRights FullAccess
For more details regarding this procedure:
https://docs.microsoft.com/en-us/exchange/client-developer/legacy-protocols/how-to-authenticate-an-imap-pop-smtp-application-by-using-oauth#register-service-principals-in-exchange
Vedran - TM Support
Comments